Getting started with permanent makeup is exciting, but those first sessions can feel overwhelming. Maybe you’re worried about cross-contamination, or your hand feels a little shaky. It’s easy for these little stresses to mess with your focus and creativity.
A slippery grip or messy setup isn’t just unprofessional—it makes it tough to focus on your technique. One small slip and all that hard work can go out the window. But you don’t have to let these worries hold you back. When you nail the basics of machine hygiene and grip control, you set yourself up for a studio that’s both safe for clients and confidence-boosting for you.
Why Wrapping Your PMU Machine Matters
Wrapping your PMU machine gives you more control over your setup and keeps procedures safe and hygienic as possible.Here's why wrapping your machine matters:
1. Barrier Protection
A properly wrapped PMU machine acts as a barrier against bloodborne pathogens, pigment cross-contamination, and surface bacteria that can linger long after a session ends. Every time you skip or rush this step, you’re increasing risk—not just for your client, but for yourself.
Wrapping your PMU machine also cuts down cleanup time and helps you maintain a controlled, repeatable setup from client to client. That consistency matters. Clients notice it, and more importantly, their skin does too.
If you’re serious about your work, “clean enough” isn’t the standard. Understanding and following real PMU safety protocols is.
2. Easy Cleanup
We touched on this above, but there’s a reason machine wrapping makes cleanup so much simpler. When the session’s done, you can simply peel off the wrap, toss it, and your machine underneath is still clean. This eliminates the need for scrubbing ink, pigment, and other mess off your PMU machine… constantly. It's a simple way to maintain a professional and steady environment.
3. Machine Longevity
High-quality PMU machines are an investment in yourself and your career. Pigment can ruin a sophisticated motor if it gets inside the device. Keeping your machine covered and protected helps your tools last much longer. It ensures your equipment stays reliable so you can continue to achieve your best results possible.
4. Professionalism
A sterile, professional setup and workspace shows that you provide pro-grade attention and care in every session. Clients notice, and they’ll trust you for it. So you don’t want to skimp on any hygiene imperatives, particularly wrapping your PMU machine. Learning these habits early is a vital part of how to start practicing PMU as a beginnerOpens a new window. It also ensures your clients know what to expect during a PMU appointmentOpens a new windowOpens a new window when they walk into such a professional studio.
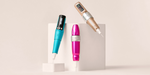
What You Need to Wrap Your PMU Machine

It’s important to use the right supplies, so you can ensure your PMU machine is wrapped safely, securely, and thoroughly.
1. Barrier film for touchpoints
It’s vital to protect high-touch spots on your PMU machine. In other words, the spots most prone to contamination, including power buttons, touchscreens, and voltage controls. Protecting these touchpoints is so crucial because you don’t want pigment, ointment, fluids, and bacteria to creep into seams, buttons, and screen edges. That kind of contamination and buildup can damage your tech in the long run and ruin your machine’s performance.
Enter barrier film: a thin, medical-grade plastic (usually polyethylene) with a light adhesive backing, so it actually grips surfaces and seals out fluids. Unlike kitchen plastic wrap, it doesn’t slide, bunch, or lift the second your gloves brush against it. Barrier films like the Saferly Barrier FilmOpens a new windowOpens a new window are a popular choice for superior protection.
- Machine bags or sleeves
You can also use machine bags to cover your whole machine. These medical-grade plastic shields protect your whole device. Use specialized tape (more on that below) or barrier film to help seal the plastic and ensure it stays put seamlessly throughout your session. We recommend using an artist-approved product like Saferly Machine BagsOpens a new window.
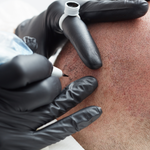
3. Grip tape for comfort
An exposed grip can be uncomfortable, and become slick… fast. Between ointment, gloves, and long, tension-building sessions, you might end up fighting your machine instead of guiding it (assuming you’re not using grip tape). Grip tape builds out the diameter and adds traction, so your hand stays steady and your movements stay deliberate for the whole session.
That extra control reduces hand fatigue, cuts down on micro-slips, and keeps your depth consistent from start to finish.
Try a professionally approved grip tape like Darklab ErgowrapOpens a new window.
- Medical tape for securing edges
Medical tape is useful for keeping your bags and film in place. It ensures a seamless experience during your workflow because your gear won't slip. Products like Saferly Medical TapeOpens a new window are perfect for machine wrapping.
How to Wrap Your PMU Machine for Safety and Comfort
. Follow these steps to work with confidence and focus on what matters: achieving beautiful results.
Step 1: Clean your hands and the machine
Start by washing your hands with soap and water for twenty seconds. Then put on fresh gloves before you touch your gear. Use a hospital-grade disinfectant to wipe down every part of your machine
Step 2: Slide the machine into a protective bag
Slide your device into a protective bag or sleeve. This keeps your tools clean and protects your machine from pigment, ink, and fluids.
Step 3: Use barrier film on any exposed areas
Use barrier film on any spots the bag doesn’t cover, like power buttons or screens. Wrap it tightly so your machine is still easy to use. This extra step protects your device and lets you focus on your work.
Step 4: Secure the bag with medical tape near the needle port
Secure the bag with medical tape near the needle port. This keeps the wrap from slipping, so you can focus on your technique.
Step 5: Wrap Your Grip
Use grip tape to build a custom grip that fits your hand.
Wrap it evenly around the grip until you reach your preferred diameter, making sure there are no gaps or ridges that could affect control. A properly sized grip helps reduce fatigue during long sessions and keeps your hand position consistent throughout the procedure.
Step 6: Secure the tape tightly
Make sure the tape is tight and doesn’t slide during your procedure. A steady grip means you can trust your gear and focus on perfecting every stroke.
Common PMU Wrapping Mistakes to Avoid

Even small mistakes can disrupt your workflow and affect the trust you build with your clients. Be sure to avoid the following:
1. Touching unwrapped cords or power supplies
It's important to watch where you put your hands so you don't touch unwrapped gear during a session. This helps you avoid cross-contamination and shows you prioritize your client's best interests. Staying focused on these touchpoints helps you feel confident in your work.
2. Putting tape directly on the machine body
Don't put medical tape directly on your device because it leaves a sticky residue. That residue attracts pigment and dirt, making your machine harder to keep clean and potentially affecting performance over repeated use. Use a sleeve or barrier film first so your equipment stays clean, protected, and free of buildup.
3. Wrapping the grip too thick
Avoid wrapping your grip so thick that you lose the ability to feel your needle depth. Precision and clarity are vital in every pass you make. If your wrap is too bulky, it doesn't let you feel the machine's vibration or control your stroke correctly.
Take Pride in Your Setup and Your Results
Build a studio you’re proud of and let your results speak for themselves.
Ready to invest in yourself? Check out our machine best sellersOpens a new window, or stock up on your favorite needlesOpens a new window and inksOpens a new windowOpens a new window. Want to keep your results looking sharp? We’ve got pro PMU aftercareOpens a new windowOpens a new window too. And if you have questions, our FAQ pageOpens a new windowOpens a new window has the answers you need to work with confidence.